Deploy Apps on a Handshake name with Heroku

Got yourself a Handshake name and want to run your server on it? Heroku lets you do it! It’s pretty simple, especially if your apps already run on Heroku.
For this guide, we’ll start from scratch with a simple Node.js app. Heroku has great guides for other languages like Python, etc. and you can skip to step 3.
Table of contents1. Create the app
2. Deploy to Heroku
3. Add a custom domain
1. Create the app
If you already have an existing app ready to deploy, feel free to skip this step. Just be sure to update the port number, etc. and other language-specific variables. More info on Heroku.
This is a very simple 10-line express web server:
// https://github.com/rithvikvibhu/simple-express-app-demo/blob/main/index.jsconst express = require('express');
const app = express();
const port = process.env.PORT || 3000;app.get('/', (req, res) => {
  res.send('<html><body><h1>Node.js on a handshake name!</h1></body></html>');
});app.listen(port, () => {
  console.log(`Example app listening at http://localhost:${port}`)
});
Fork this repo or create your own on GitHub as we’ll be linking it to Heroku next.
https://github.com/rithvikvibhu/simple-express-app-demo
2. Deploy to Heroku
Okay so now there’s code on GitHub and it’s ready to go live on Heroku. Create an account if you haven’t already.
Create a new App with the “New” button on the right.

Give it a name and “Create App”.

Click on GitHub and link the account.

Search for your repository and click “Connect”.

You’ll probably also want to enable Automatic Deploys so that any changes on the GitHub repo will automatically update on Heroku.

Finally, deploy it manually for the first time with “Deploy Branch”.

The app must be running now! Visit it at <app-name>.herokuapp.com to see the page load properly. If it doesn’t, check for errors in Heroku’s logs.
3. Add a custom domain
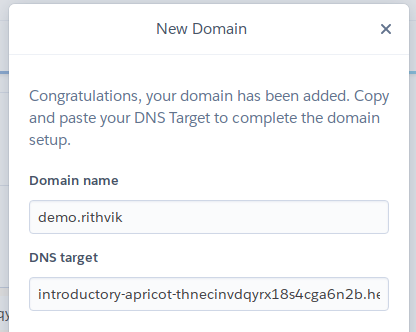
To be able to load this site on a Handshake name, go to the app’s settings and scroll down to the Domains section. Click “Add Domain”.

Heroku doesn’t support bare names (like http://somename/), only second level domains (like http://website.somename/).
Pro tip: Later, set up a Namebase Redirect from the bare name to the subdomain so people can visit on
http://myname/and still reach the website.

Note down the DNS target (and laugh if you get a funny named one). We’ll use this in the next step.
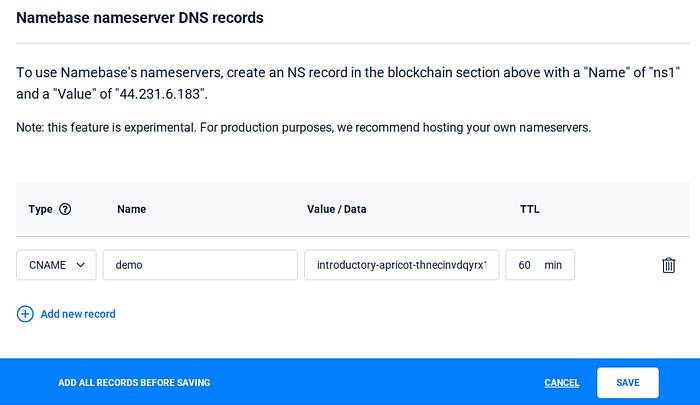
If you got your name on Namebase, there’s no need to edit the Blockchain DNS, simply scroll down to “Namebase nameserver DNS records” and add the record with the following details:
- Type: CNAME
- Name: the subdomain you picked in the previous step (like
website) - Value: the DNS target from the previous step
Don’t forget to click save!
Pro tip: If you have a custom name server set, create the same record there instead.
That’s it! Visit the handshake name and see the server respond.

Hope this helps anyone new to Handshake. If you have any tips or suggestions, please leave them down in the comments.